I’ve recently had designers asking for various pieces of metadata to show up in list views.
What looks simple to a designer sometimes requires an extra async request for every item in a list. This came to a head today when I was asked to add a particular piece of metadata that required a two-step promise chain involving two separate REST endpoints for every single list item. It was time for some optimization.
Memoization seemed like the ideal solution. I thought I would cache the responses to each request so that as a user paged through the list, the app would check if that response had already arrived. If it had, the app would return the memoized response, but if not it would send off the real network requests.
That would have worked OK, but not amazingly. The problem is, that approach doesn’t account for in-flight requests. Let’s say there are 10 list items. Five of them will send off the exact same promise chain at about the same time. If we memoize the identical result of those five promise chains, we will have saved async calls for the future, but we still send five identical requests. All we really needed was one.
Then it hit me: instead of memoizing the result of the promises, I could memoize the promises themselves! This is brilliant.
/**
 * Sends off a set of requests to figure out the
 * credits a user has given a username. It memoizes
 * the promise to prevent duplicate requests.
 */
getCreditForUser (username) {
  let ret;
  if (this.inFlight[username]) {
    // there is already an in-flight or fulfilled promise for this username
    ret = this.inFlight[username];
  } else {
    // there is no in-flight or fulfilled promise for this username, so send 'er off
    ret = this.inFlight[username] = this.users.getByName(username)
      .then(userObj => this.creditService.getById(userObj.credit));
  }

  return ret;
}
Take the afore-mentioned example. The first of the five identical list items sends off a request for the metadata and memoizes the promise for that request. The next four items, instead of sending off their own requests, are provided with that exact same promise. This means that when those network responses are received and the promise is fulfilled, all five list items receive the result from that single pair of requests.
Those fulfilled promises can be used in exactly the same way long after the network responses were received. This provides an elegant solution to the case when you potentially have many duplicate requests and want to cut unnecessary bandwidth for performance gains.
I often come across scenarios where the data that my application needs is available, but not in a format it can readily consume.
Cloud functions and other microservices really shine here. They can convert data from one form to another on demand and are generally very inexpensive. Since they are distinct execution contexts, they don’t have to match the consuming application’s tech stack. This frees them to use the language and libraries best suited to the job of conversion.
They also totally encapsulate (hide) the often inelegant conversion code, keeping the consuming application’s logic simple and focused.
One conversion I routinely need is from static websites to RESTful APIs. Let me illustrate with a couple of examples.
Example 1: Library Catalog Results
Take the example of my local library website. I want to create a browser plugin to notify online shoppers when a book they’re looking for is available at the library.
The library website provides a searchable online catalog. However, all the pages on the site are rendered server-side. The library doesn’t expose a public web API, either.
As it stands, my only option is to send my search query to the library’s server and add logic to my extension to parse the returned search results HTML.
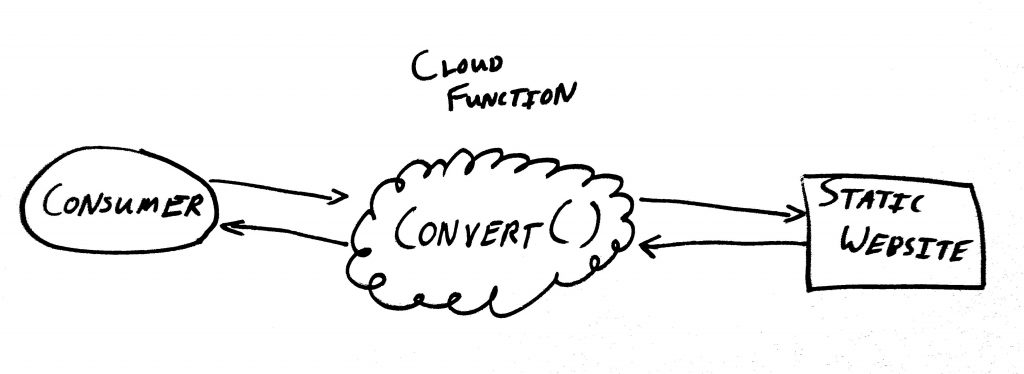
But what if we instead create a cloud function that accepts a request from my browser extension, makes that network call to the library’s server, parses the returned HTML, and sends back a nicely formatted JSON response?
Conversion API Architecture
We will have effectively converted my local library’s statically rendered website into a RESTful JSON API.
Now that’s cool.
Here’s my cloud function code. (I use the Serverless framework with AWS Lambda for development and deployment).
And here’s an image of the JSON that my application gets back from the new API. This lists the first entries in the library’s catalog for the word computer.
Hopefully, you can already see the power in this microservice data-conversion architecture.
Example 2: Computer Science Faculty
Let’s say we’re building an app to recommend faculty mentors to potential graduate students at the University of Utah based on their research interests.
This bears many similarities to the library example. But do you notice differences?
Here’s an important one: Faculty change very rarely.
In the last example, it was necessary to poll the library website every time the cloud function received a search request from the consumer. However, this is often not the case.
In this faculty example, actually checking the static website for updates is rarely necessary. That frees us to cache the faculty data and simply poll the website for updates on an infrequent basis. Making this change decouples the data source from the consuming application. We’ve moved from one cloud function to two:
Cached Conversion Architecture
On the one hand, I like this decoupling because if you don’t control the data source (static website or otherwise), unannounced changes to it may require an update to the conversion code.
Without this decoupling, the conversion failure would likely be immediately apparent to an end user.
With it, the consuming application will probably continue to function just fine for a little while. This gives you time to update the conversion code with few hiccups.
The only downside, of course, is the extra complexity of making sure the cache is always fresh enough to be viable for your consuming application.
Conclusion
While this article is geared particularly toward converting from static websites to RESTful APIs, let me reiterate the general applicability of this cloud-function conversion pattern.
It provides a modular, targeted, independent environment in which to perform the sometimes complex conversion operations that are frequently required by modern applications.
I recently collaborated on writing a new end-to-end (E2E) test suite for ArcGIS Hub.
Let me define what I’m talking about. E2E tests usually take the form of automated GUI tests that run against a live system.
In the web context, an end-to-end test runner often remotely automates a browser. That means that classic unit testing tools — mocking, stubbing, access to internal state, etc. — are generally unavailable.¹
This makes end-to-end tests very high-fidelity but also introduces potential pitfalls. Here’s my advice.
Don’t Write Them Without Defining the Reason
Why are you writing these tests? In this paper², researchers identified two main reasons developers write these and other GUI tests:
Automated acceptance testing (an encapsulation of customer expectations).
So which one is it for you? Or is it another reason altogether?
Articulate your goal and make sure your team is on the same page about this. This ensures that everyone understands exactly what the purpose and value of these tests will be.
Don’t Duplicate Coverage
Let’s say you’ve created a new UI component. If you can cover the functionality in a unit test (or whatever your particular framework calls it), do it there!
Unit tests are generally easier to maintain, less flakey, and less expensive to run in your CI pipeline.
E2E tests should be covering the areas only they can cover. Usually, these are the big-picture user stories that span many components and views. We’re talking about big, high-value flows, like:
Signing up.
Logging in and out.
Creating a new <whatever users create in your app> and sharing it.
Updating a user’s profile information.
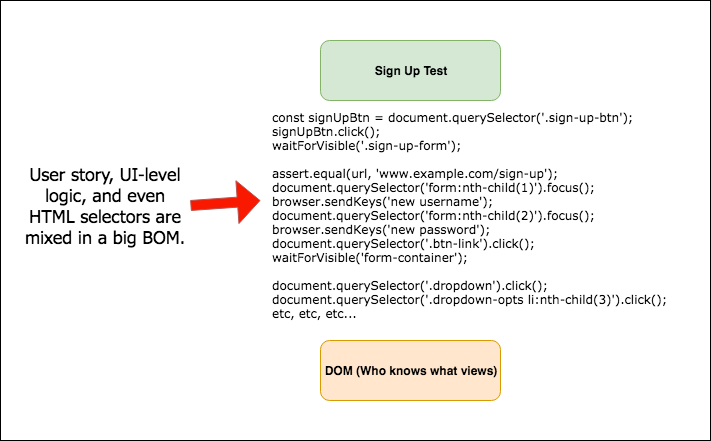
Don’t Use a Single-Layer Architecture
In a web context, a single-layer E2E test architecture would look like this (so this is what to avoid):
If you use a single-layer architecture for your E2E test suite, you are in for a world of pain.
Specifically, you (and others) will find:
Tests difficult to understand and, hence, to debug. Mixing high-level and low-level logic will introduce way too much detail into the tests.
Relatively unimportant UI changes will break lots of tests. This is because logic and HTML selectors will have been massively duplicated, creating multiple points of failure.
Large swaths of your test suite will need to be updated when the UI changes.This goes along with the previous point.
You won’t be able to reuse portions of test logic.This will create extra effort and headaches.
My voice may pop into your head… laughing at your pain.
Instead, use a multi-layer architecture that allows the tests themselves to be understandable expressions of user stories. Hide area-specific logic and selectors in mediating layers.
Specifically, I recommend using the Page Object Model. See Martin Fowler’s article³ to learn more.
Don’t Use Breakable Selectors
This section is specifically geared toward my specialty, web development, but the principle of using robust methods to get hold of the right UI element is always applicable.
In the web context, there are several ways to find a particular element and they aren’t all equally impervious to changes in the UI.
Let me rate them in order of break-ability.
The CSS selector (e.g. .sign-in-btn). Classes are liable to change, so these are liable to break.
The :nth-child() selector. Orderings of elements at the same hierarchical level seem to be subject to reordering. In addition, these selectors are often non-descriptive, making error messages from your test runner harder to understand.
The scoping selector (e.g. .img-view .container .img-wrapper img). This one seems less likely to change than the previous two because element hierarchy is more immutable. However, this one is also usually mixed with CSS selectors.
The ID selector (e.g. #thumbnail). It seems like IDs almost never change, but they can. There may also be other reasons to avoid adding them to elements, such as if the UI framework you are using inserts and relies on them internally.
The data-test=”some-unique-slug” attribute. This is an attribute added to the target element, solely to give the test a handle. It can be as descriptive as you want and, as long as the value is unique, the test will be able to find it. It is totally impervious to changes in layout, ID, styles, and even element type. Also, most developers/UX people know not to mess with it. This one is the silver bullet.
I’m not going to preach hellfire against CSS selectors. It is up to you which selectors you choose to trust.
However, if it was up to me, I would choose data-test attributes every time. When my E2E tests fail, I don’t want it to be because of a style change.
Don’t Expect Your Suite to Be Maintenance-Free
When you create an E2E test suite, it becomes a reflection of your app’s user interface.
How often will that UI change in the next year? That’s right. All the time. So, the reflection has to evolve with it. You and your team need to accept and embrace this fact of end-to-end testing.
Otherwise, you will likely find yourselves in an adversarial relationship with your test suite. That will cause them to become flaky, annoying, and ignored. If you allow that to happen, you will have wasted your effort!
Don’t Ignore Flaky Tests
In general, developers are prone to blame tests first and their changes second.
I have noticed that this is even more pronounced in the context of end-to-end testing. And, because E2E tests rely on live, external systems, it takes an extra effort to make sure they don’t randomly fail because of non-deterministic factors such as network conditions, current load on external services, etc.
The effort is worth it. If the tests are too flaky, developers won’t trust them. They just won’t. The tests will become annoying instead of helpful.
Each flaky test is different. The test may need to wait longer for a view to load, or it may need something else. Regardless, my advice is to either shore it up or remove it. Don’t leave it in there to tarnish the suite’s reputation.
Automatically reporting basic telemetry, such as run-length and failure/success, to a dashboard interface can aid in identifying problem tests. We use Elastic’s Kibana.
Conclusion
End-to-end tests can be powerful both as an articulation of user expectations and as a guard against regressions. I think they absolutely deserve a place in a developer’s toolkit.
Avoiding these pitfalls will help you to apply this useful tool with as much effectiveness as possible.
[1] Some frameworks such as Cypressdo provide XHR request and DOM mocking. This can be very useful, but keep in mind that, while these features may reduce flakiness, whenever you mock an external system you are decreasing the fidelity of your test.
[2] Hellmann, T. D., Moazzen, E., Sharma, A., Akbar, Z., Sillito, J., & Maurer, F. (2014). An Exploratory Study of Automated GUI Testing: Goals, Issues, and Best Practices. (External link)
“How can you possibly miss them?” asked my wide-eyed friend as he sat in the passenger seat of my car on the way to a concert. “It’s so crazy that you can miss such big design flaws like that.”
“It’s so crazy that you can miss such big design flaws like that.”
I had been describing a side-project I’d been working on. It was a local events app and I’d just been telling him about how often flaws in the app’s usability escaped my attention. So many UX and QA people (not to mention end users) must sometimes feel the same incredulity as my friend. “How did the developer miss this?”
Well, I’m hoping to give you a look into the life of a developer to encourage you to empathize and understand why we do. Sure, sometimes we might know there’s a problem and just be too lazy to fix it. But that isn’t the reason most of the time. Here’s the reason (drum roll)… are you ready?
We are working in our own darn bedrooms!!!!
(And I don’t mean that literally.)
Here’s what I do mean. My wife and I recently returned from a trip to Thailand. We got home, unpacked and I left a big blue suitcase open on the floor in front of our bedroom door for three months. Did I really just admit that? Yes. T-h-r-e-e months.
Why? Am I just a slob? Do I have something against tidying up? No! I swear that I did not see that big blue suitcase lying on the floor in front of me. Or rather, I saw but did not perceive it. For three months.
I subconsciously learned to avoid it every time I went in and out of the room. I learned not to expect our bedroom door to open all the way. I forget it had ever opened all the way. I even knew my way around that suitcase in the dark and successfully avoided stubbing my toe every time I got up in the middle of the night to use the bathroom.
I knew that suitcase just as well as the rest of my bedroom, and I noticed it just as little.
I knew that suitcase just as well as the rest of my bedroom, and noticed it just as little.
So it is with development. The applications we develop are our bedrooms. We know their ins and outs, their quirks, their layout. We could navigate through whatever flow we’re working on blindfolded.
This is why we need user testing! If my wife and I had sold the house and the new owners had walked into the bedroom, do you think they would have accepted the suitcase as just another feature?
No–but I did. So, next time you see a crazy design flaw come down the pipeline, remember: your developer friends are working in their own bedrooms.
I’ll start this with a disclaimer: it’s nearly always best to generate thumbnails server-side. It’s fast and doesn’t duplicate computation over multiple clients. In most cases, I would probably create a cloud function to generate thumbnails of various dimensions and set it up to be triggered by a storage event (e.g. saving an image to AWS S3).
However, I make a case for client-side thumbnail generation when:
You don’t control the backend of your application
Your user’s experience would be significantly improved by the use of thumbnails
Take for example the hybrid mobile app my partners and I are building to help dermatologists take and manage patient photos. The backend is provided by the clinic’s EHR, so the app can only interact with it through an outdated network API and therefore has no internal control. It’s a photo management app, so thumbnails are prevalent and play a significant role in the user experience. However, rendering full-sized images as thumbnails is computationally intensive (especially in a mobile context) and we noticed that it creates a lot of UI lag.
So, we decided to try out dynamic client-side generation and we were pleased with the result. The dynamic bit means that we generate thumbnails on the fly as the photos are loaded. I’ve included a simplified gist below that illustrates how we did this in a browser context (webview in the case of our hybrid app):
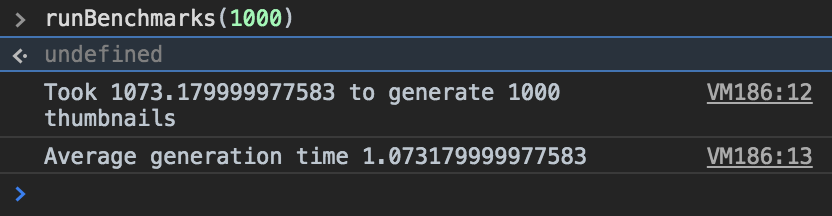
Running some performance tests on a photo of my hand yielded the following results:
Benchmark results
My hand (original)
So, dynamic thumbnail generation turned out to be pretty fast on average, certainly faster than I expected. Some of the thumbnails took 2–3 milliseconds, but on average they took about 1.07 ms. That said, I would encourage you to test with context and the actual images you would be using. That hand image is pretty small, so it’s going to be much faster than something HD.
Dynamic thumbnail generation turned out to be pretty fast… certainly faster than I expected.
Generating thumbnails dynamically wasn’t the only option we considered. We could have stored the thumbnails with the original photos in the EHR whenever a photo was saved. However, this was problematic because there was no way to mark them as hidden, so they would have cluttered the doctors’ desktop interface. In addition, there was nothing to stop inadvertent deletions (our situation is akin to having your S3 bucket viewed and edited directly on a daily basis by your users).
Alternatively, we could have generated the thumbnails on either the client or server-side and stored them in an external system we did control. However, this was ruled out because of the security and liability implications of taking responsibility for storing medical photos (not to mention the extra trouble of syncing the new external system with the EHR).
[Client-side thumbnail generation] is worth considering in cases where you have no control over the backend and thumbnails would improve your UX.
In conclusion, dynamic thumbnail generation (or client-side generation in general) is usually not the best way to go. But, it is worth considering in cases where you have no control over the backend and thumbnails would improve your UX.